
Notes
- These are my favorite field drills, not necessarily the best ones that exist. I’ve tried others, but I keep coming back to them for their simplicity and direct translation to on-field motions.
- There’s nothing special or secret about any of this. Most high school football players (and many soccer players) are taught versions of these drills early in their first season. The neat part is that the same drills are also in the training videos of some of the best college programs. There are slight naming differences between people/programs, so sorry if you’re not able to find a video using my names.
- Safety Notes
- Adjust your intensity to your body’s current condition. If you’ve been on extended rest for offseason or injury, do not immediately start with 80%+ intensity and a bunch of acute cuts.
- Always try to avoid doing movements in a way that causes your knees to bend inward. This is how ACLs are torn, and the form you do during training reps is what you’ll do at full speed on the field. Load weight a little outside the center on your foot, and angle your toes inward while turning your hips into turns.
- I am not proud of the MS Paint work in this post.
Format
- I generally do 4 sets of 4-5 exercises apiece
- Set 1 is an extension of the warmup and a check of my form
- Set 2 is moderate intensity (in the context of the workout)
- Set 3 is high intensity (in the context of the workout)
- I often add reps or do harder variations
- Set 4 is back to moderate intensity
- A brief cooldown and stretching period is encouraged
Ramp Up
I normally take at least two months off between the end of each ultimate frisbee season and training for the next. During this time, I do a lot of strength training, bike riding (road and stationary), and probably not enough yoga/stretching. When I start activity again, I always go through a 4-phase ramp up before stepping on the field for play.
- Phase 1: low to moderate speed single-direction movements (boring)
- Phase 2: low to moderate speed multi-direction movements
- Phase 3: mix of Phase 2 and full speed single-direction movements
- Phase 4: moderate to full speed everything
I do at least four workouts in each phase before moving onto to the next. I plan on each phase taking two weeks and often end up doing more than four workouts in each.
A lot of these drills and movements can’t be done in Phase 1. During that time, my reps are literally moving in one direction, stopping slowly, then going back the opposite direction. Jog forward, backpedal back. Forward left diagonal, back right diagonal back. Left side shuffle, right side shuffle back. The highlight of the entire workout is a 50yd jog at 40-50% intensity/speed. It’s super tedious, but it activates stabilizing mechanisms that have been dormant for over two months and lets me assess how my body is reacting to movements/activity. I’ll sometimes stay in a phase longer than planned because something feels weak or unstable.
1-Person Drills
Square/Box
I consider this the foundational drill of my workouts. I do it every time I go out. By adjusting path, body orientation, and cone distance, you could build a pretty solid (but boring) field work plan with just this drill.
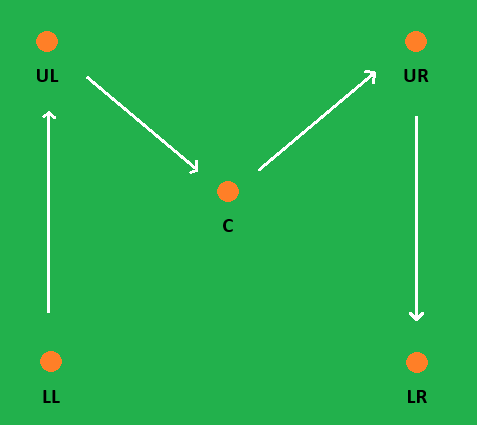
“M” Path (left to right)
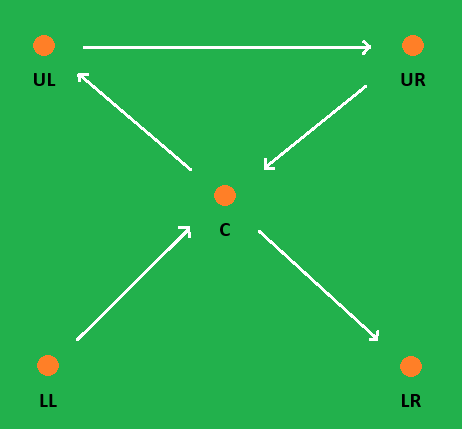
“X” Path (left to right)
My default distance for the outer sides of the square is 10 yards. I find this is a nice mix of allowing some acceleration/speed while keeping the focus on refining directional changes. Decreasing the distance focuses more on quick movements, while increasing the distance focuses more on acceleration/deceleration and fitness.
All reps should be mirrored coming back. My default orientation for this drill is hips forward at all times, meaning I’m doing diagonals like [C to UL] and [UR to C] by overlapping my feet while keeping my hips facing forward. Those overlaps are pretty uncomfortable for many people, and this is a great drill to hone that once you’ve introduced the motion with standalone single-direction reps.
- M path notes (left to right)
- LL to UL: jog/run forward
- UL to C: left foot leads by stepping behind right
- C to UR: left foot leads by stepping in front of right
- UR to LR: backpedal
- Chop steps coming into UL before planting with your right foot and initiating the next segment by swinging your left foot behind your right foot
- For the C transition, plant your left foot first (left side of the cone), then right foot (right side of the cone), all while leaning forward to swing your momentum on the inside of the turn. Initiate the next segment by using your left foot to transfer weight to your right foot before pushing hard off your right foot. Ideally, it’s all one smooth motion.
- [UR to LR] is a crouched backpedal with your weight over your toes and short, choppy steps that graze the top of the turf/grass.
- X path notes (left to right)
- LL to C: left foot leads by stepping in front of right
- C to UL: right foot leads by stepping in front of left
- UL to UR: side shuffle
- UR to C: right foot leads by stepping behind left
- C to LR: left foot leads by stepping behind right
- For both C transitions, plant your outside foot (right foot for [LL to C]) with the toe turned slightly inward and your hip slightly turned in the direction of the next cone so your leg absorbs the load with your hamstring and glutes instead of full lateral on your knee. Lean to the inside of the turn to swing momentum, then push off the bent plant leg to initiate the next segment.
For a different flavor, change your hip orientation. If you start by facing left on an M path, [LL to UL] becomes a side shuffle, [UL to C] becomes a back-left diagonal, etc.
For a tougher (Set 3) version, align your hips with your direction and do acute cuts around all cones. For X path, [LL to C] ends with a 90 degree turn to UL, which ends in a 135 degree turn to UR, etc. The near-complete loss of momentum and initiation around each turn gets tiring very quickly. I won’t try to describe the form for a 90 degree turn here; if you’re interested, hit me up.
Ladders
There are dozens of good ladder movements described in detail on YouTube, so you should definitely go there when you get tired of these. I’ve done my best to make clear diagrams, but if they don’t make sense: again, YouTube exists.
- The number in each notation is the order of the step in the sequence
- The letter in each notation is the left that should be touching the ground (left or right)
- The grey line is the general movement of your body, sometimes adjusted so it doesn’t overlap the step notations.
- Every trip down the ladder should be mirrored (return by starting on a different side or with a different foot/orientation)
Ickey Shuffle
Lead Left
The idea is to touch each foot once in each square while moving diagonally back and forth across the ladder, planting outside the ladder. You’ll naturally fall into a 1-2-3 cadence (center, center, plant). Swing your arms twice each time across the ladder. Mirroring this one isn’t terribly important since it already alternates within each rep.
- Start back and to the right of the ladder
- Step your left foot near the center of the first square, but only “bounce” it as part of your motion across the ladder.
- Step your right foot (also) near the center of the first square as the trailing part of the weight transfer.
- Plant your left foot outside of the ladder even with the second rung
- Pivot your weight forward using your left foot as a base
- Step your right foot near the center of the second square as a bounce
- Bright your left foot down near the center of the square as the trailing part of the weight transfer
- Plant your right foot outside of the ladder even with the third rung
- Pivot your weight forwarding using your right foot as a base
Variation: Hold your balance a second or two every time you plant outside the ladder. Focus on even balance and the weight transfer, not allowing your knees to bend inward. This is a good exercise for phases 1 and 2.
Lateral In and Out
Lead Right
The idea is to go down one side of the ladder, touching both feet alternately inside a square and outside the ladder. Your body/center of gravity should stay over the side of the ladder, and your arms should be swinging at half time (once each time you cross over the side of the ladder). Mirror this in down and back pairs.
- From the perspective shown above, start down and to the left of the ladder.
- Step your right foot a little over halfway across the first square
- Step your left foot a little less than halfway across the first square
- Step your right foot outside the ladder just past the second rung
- Step your left foot outside the ladder just short of the second rung
Vertical In and Out
Lead Left
The idea is to step both feet into each square in sequence, then step each outside the ladder on opposite side before bringing them back together in the next square.
- Start just back from the ladder
- Step your left foot into the left-center of the first square
- Step your right foot into the right-center of the first square
- Move your left foot laterally and step outside the ladder to the left
- Move your right foot laterally and step outside the ladder to the right
- Step your left foot into the left-center of the second square
- Step your right foot into the right-center of the second square
- Move your left foot laterally and step outside the ladder to the left
- Move your right foot laterally and step outside the ladder to the right
Mirror by leading with one foot on the way down and the other foot on the way back. Your body should go straight down the middle of the ladder. Swing the opposite arm with each step.
- Variation 1: Vertical Out and In. Start with the steps outside the ladder instead of the square steps.
- Variation 2: Hops In and Out. Hop with both feet to the first square, then do the outside steps at the same time before jumping with both feet to the second square.
- Variation 3: Hops Out and In. Hop to the outside steps simultaneously, then bring your feet together in the square before hopping to the outsides of the next square.
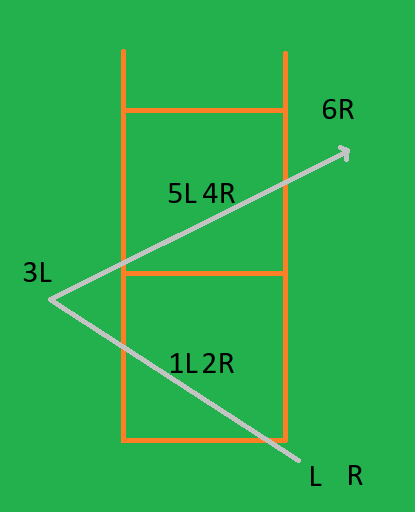
Slalom
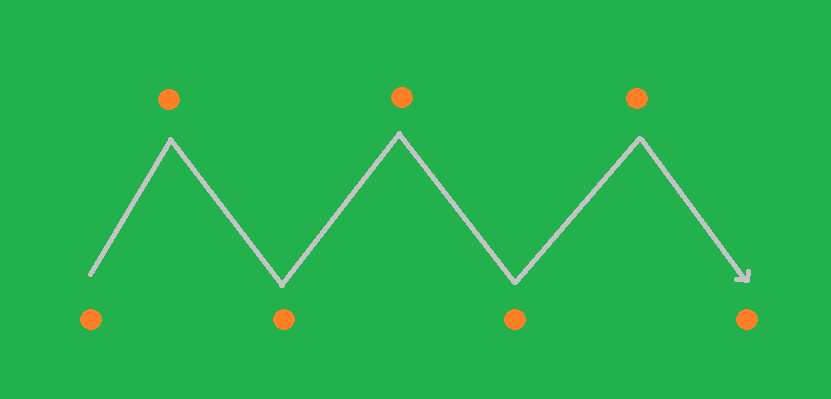
The idea is to use short, choppy steps to slalom around two lines of cones. Your hips are always pointing up/forward, so there will be some element of overlapping steps (even if they’re not fully over your other foot). Your feet should go above the top cones and below the bottom cones; the grey line is between the lines because your center of balance should stay somewhere between the lines. The better you get at the drill, the less your head moves forward and backward, and the more you can look up and see/sense the cones at the bottom of your vision.
I generally set up the cones in each line 2 yards from each other and the lines about 2.5 yards away from each other. This distance is intended to work on short/quick directional changes. With that setup, the ideal is 3-4 steps between each cone (not including the plant to change direction). This drill works on situations where you have to change directions multiple times in a small space, and part of that is keeping your feet in contact with the ground as much as possible: you can’t change direction when your plant foot is in the air.
The closer the cones are left/right, the more you’re working on straight backpedals. The farther apart they are, the more you’re working on diagonals. Moving the lines farther apart works more on fitness and less on consecutive quick directional changes.
- Variation 1: Moving laterally between the lines of cones. Instead of focusing on keeping your weight centered between the lines, it’s more about efficiently arresting momentum and loading the plant leg to naturally/safely move into the next sequence. Your toes and hips should be turned slightly toward the direction of the next sequence to safely direct your push-off.
- Variation 2: Put down two sets of cones 40 yards from each other. Complete one set normally, then run forward to the next set. As you approach it, chop your steps to reduce momentum so you can enter and complete it in the opposite direction of the first set. When you finish that set, backpedal to the start point. You end up making a rectangle with the top and bottom sides being slaloms.
Mini Hurdles
Here are the hurdles I like, but I’m sure there are other good kinds/brands.
Most movements can be done forward, laterally, and backward. I generally do them in down and back pairs, alternating the lead foot. With the exception of movements that involve actual jumping, the goal is to do these in a crouch with a low center of gravity and legs pulling up to clear the hurdles as opposed to fully upright and jumping between gaps. Your shoulders and head shouldn’t have a lot of vertical travel, and your feet should generally be shoulder width or a little closer. The goal is to maintain a stable platform that can change momentum at any point.
2-Per
Lead Left
What I consider the basic hurdle movement: two feet per gap. Pump arms once per step.
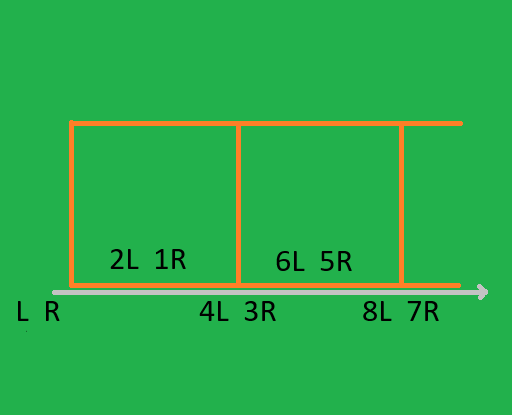
2 Forward, 1 Back
Lead Right
This diagram only shows one cycle because I think more than that would be a net decrease in clarity. The step notations are artificially wide to allow space for the body line; they should be a little narrower than shoulder width.
- Step your right foot in the first gap
- Step your left foot in the second gap
- Find the balance point on your left foot
- Take one step back with your right foot
- Find the balance on your right foot
- Start the cycle again by stepping your left foot in the second square again
When you get familiar with the movement, you can leave some weight leaned toward body center instead of fully balancing on each foot, loading for the push rather than holding directly over your foot. However, just “stabbing” your foot in a gap without actual weight transfer defeats the purpose of the drill.
The low-intensity lateral version of this is a great Phase 2 exercise, and the full-speed backward variation is a good challenge.

Slalom
A lot of the same concepts as the Slalom cone drill (very short steps, low crouch) in an even smaller space and with narrow gaps between hurdles to navigate. Can be done facing forward (lateral movements) or to the side (forward/backpedal movements).
Hops; 2 Forward, 1 Back
- During Sets 1 and 2 (may not be fully warmed up), this is more of a calf hop to clear the hurdles. The focus is on maintaining solid balance through several hops with quick ground contact.
- During Sets 3 and 4, this is a jump for height that involves a crouch and engaging your hamstrings, quads, and glutes. The focus is on maintaining enough control and balance during the landing of a high jump to accurately aim yourself to the next gap.
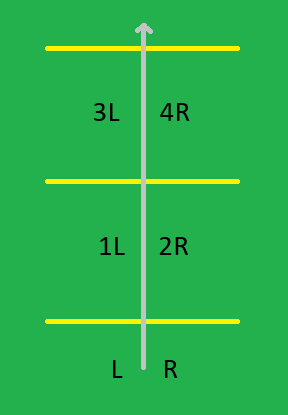
Shuttle
This is a sequence of five movements between five lines (indicated by cones) that are spaced by a standard length. The distance of each movement is increased by one line/cone until the fifth, which returns to the original one.
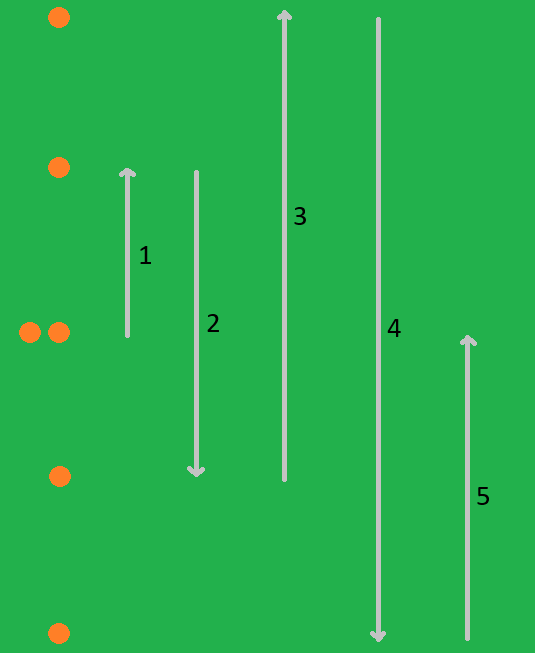
- Overlap all segments; the diagram shows them separately to make the sequence clearer.
- I usually use two cones on the middle/start/finish line so I can easily get my bearings during the drill.
- My standard distance between cones is 5 yards, but you can scale that up or add more cones to increase the difficulty.
- This is one of my go-to drills for frisbee-specific fitness training because I think it’s a good representation of our movement during a point: a combination of short/quick bursts and moderate-distance sprints. The other drill I use primarily for fitness is Variation 2 of Slalom.
- Since you’re essentially just doing straight-line segments and fully stopping after each, this is a very flexible drill. You can combine:
- Forward runs
- Backpedals
- Side shuffles
- Diagonals
- Hip switches
- Transitions from any of these to any other
- Additional movements at each line (lunges, burpees, pushups, etc.)
Comebacks
This is a defensive drill that focuses on the transition of momentum from a backpedal to forward. For frisbee, if you can get comfortable playing most of your defense facing the disc, it opens up an entire world of spacing and poaching that is very difficult (if not impossible) when switching hips over and over to match the person you’re covering.
The black lines are the initial backpedals, and the grey lines are the forward-momentum paths. I haven’t included cones because spacing will vary. For quicker movements (handler stack), try taking only a few steps before breaking. For higher-speed movements (cutting space), get some momentum and see how it feels. If your calf flexibility is limited, stick to lower speeds until it improves.
Potentially interesting note: this movement is basically why I use lacrosse or football cleats for ultimate frisbee: they have a toe spike. I wore Adidas Copa Mundials for years, but I gave up a score during a muddy sanctioned game because I slipped during a comeback. After a season using skill-player focused Adidas football cleats, I switched to New Balance lacrosse and have used them ever since. If you do this drill with and without toe cleats, you’ll notice the difference.
A version of this movement can be done in a Square drill by doing the M path and starting with a backpedal. The top corners will be diagonal comebacks.
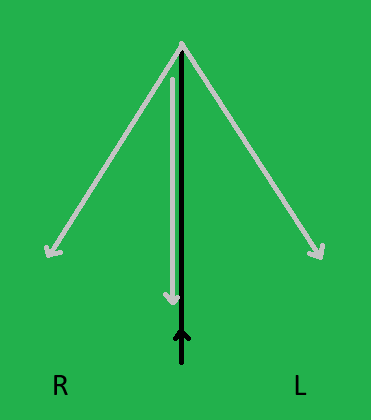
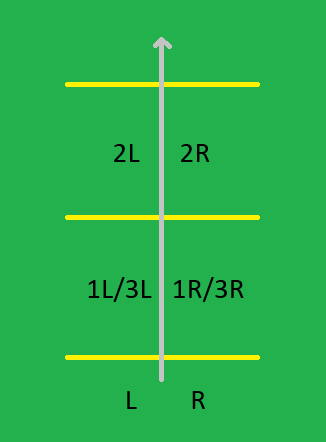
Straight Start
This is what I consider the foundational version of the drill. Backpedal straight backward, then plant and either go forward, right, or left. The diagram above is labeled to reflect the runner’s perspective.
- I think an acute angle reflects the most common on-field usage, and if you’re doing the Square drill using the M path, you’re already working on diagonal-to-diagonal transitions.
- For a right return, plant your left foot as an plant, lean forward and pivot your weight around the inside of the cut.
- For a left return, plant your right foot as an plant, lean forward and pivot your weight around the inside of the cut.
- For a straight return, you can use either foot as an plant.
- Always use your non-plant foot to accelerate out of the cut
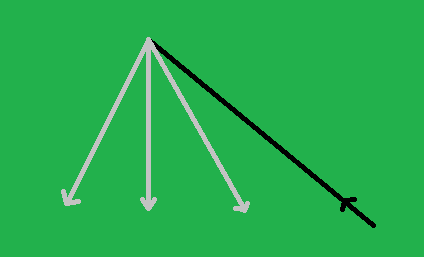
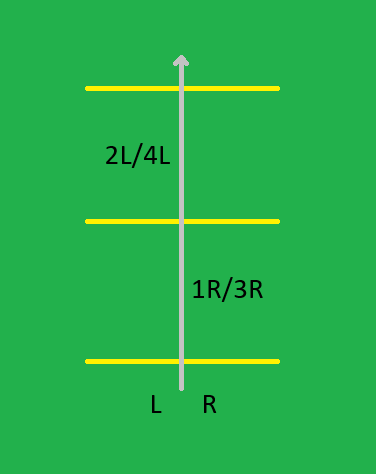
Diagonal Start
- The diagram shows a standard back-right backpedal start. Mirror it horizontally for a back-left start.
- For a back-right start, always use your right foot as a plant, leaning forward and pivoting your weight around in the inside of the cut to your new path.
- For a back-left start, always use your left foot as a plant, leaning forward and pivoting your weight around in the inside of the cut to your new path.
- Always use your non-plant foot to accelerate out of the cut
- Variation: Have a partner call out your break timing. You will often have to take an extra half or full step to plant the correct foot, but the efficiently gained in the momentum transfer will more than offset the cost.
Hip Switches
No graphic here since a step diagram won’t tell you much. I’ll do my best to describe the motion of turning over the right shoulder from a backpedal to a forward-facing run. Reverse all the lefts and rights for a turn over the left shoulder. Search for defensive back “hip switch” or “hip flip” drills on YouTube to see how it’s supposed to look. I will be describing a full 180 degree turn as opposed to going back and forth from diagonal alignments.
- Start by backpedaling normally
- At the call/decision, the next time you’re going to step with your right foot, get a little vertical (out of your crouch).
- Defensive back videos will tell you not do do this, but I think it significantly lowers the risk of getting your feet/legs twisted, especially when you’re starting out. If you get really good at this and are more athletic than me, feel free to do it in a full crouch.
- As you step back with your right foot, rotate your hips to the right. By the time your body passes over your right foot, your hips and right foot should be pointing perpendicular to the path of your momentum.
- Drive your left knee around and swing your right elbow to complete the rotation of your hips
- When you’re starting out, you can swing your left leg a little wider to avoid getting your feet tangled. As you get more comfortable with the motion, you’ll probably naturally streamline it by keeping your leg farther in during the turn.
- By the time your left foot contacts the ground, your hips should have completely rotated and be facing forward.
- Your upper body will probably be moving a little faster than your feet, so you’ll naturally be leaned a little forward with your right elbow back. Use that angle and stance to push off your left foot and explode out of the turn.
- When you’re starting out, you might not be stable enough on this step to push off effectively. If that’s the case, wait until the next (right) step to do the push. As you get more comfortable with the motion, start pushing off that initial left step.
- The combination of your lateral momentum and going more vertical should mean you’re not putting much weight on your right leg, just kind of vaulting over it. Staying up on the ball of your foot also minimizes the dig of your cleats into the ground. This all means the potentially-dangerous torsion movement actually doesn’t put much stress on your knees and hips.
Going from a forward-facing run to a backpedal is the same idea: vault over your inside foot on cadence, have your hips halfway around by the time you get over your plant foot, and use your tipping momentum to drive on your first step after the turn.
2-Person Drills
Mirror
This a little more advanced drill that you can do when you’re comfortable with all the transitions from all the variations of the Square drill. The idea is that one person holds a disc (or cone, or any other easily-visible object) and gives directions for the person running.

Starting Positions
There are no cones or boundaries; I just made the square to show the approximate area the runner will probably be. The disc holder should face the runner with the disc held straight in front of their chest. The runner should let the disc holder know when they’re ready.
The disc holder should then move the disc to indicate one of eight directions, and the runner will move in that direction. On the holder’s timing, they will move the disc to a different position, and the runner will transition to that direction.
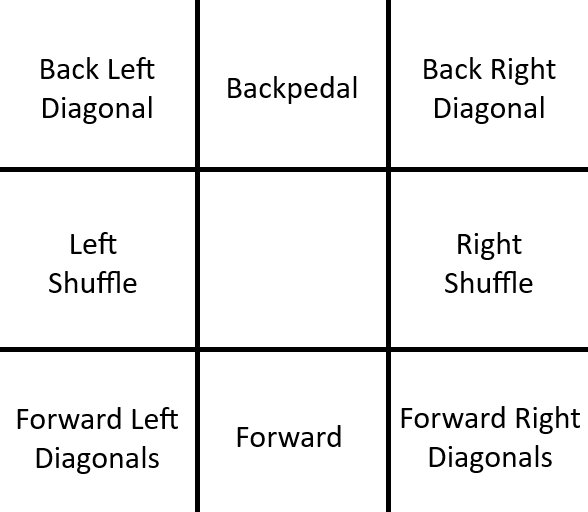
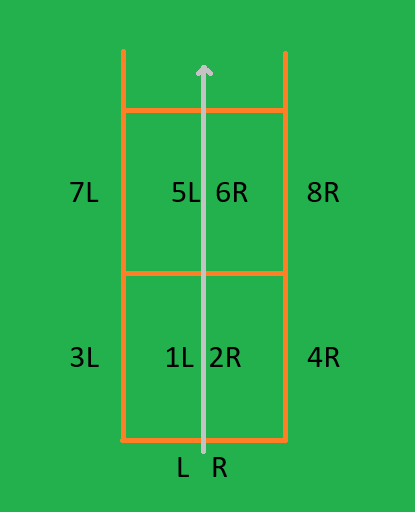
Direction Grid
Runner’s Perspective
- The runner should move in the indicated direction relative to their current position, not where the disc holder is. People new to the drill will often literally run to the disc, especially in the forward positions.
- The runner should do the whole drill in a crouch with hips facing forward
- The disc holder should try to keep the runner in areas where the latter can easily see the disc
- One of the goals is to train the runner’s brain to react to visual cues (cutter hip positions, a handler cocking a throw, etc.), but if the runner is struggling to translate the disc positions, the holder can also call out the directions as they move the disc. When the runner is comfortable, the holder can go back to just moving the disc.
- The runner should focus on making sharp/clean transitions more than doing things really quickly.
- The holder should exaggerate the disc positions to make it easier for the runner to identify them
- For forward positions, the disc should be at the holder’s knees or lower.
- For left/right positions, the holder should take a step and lean that way.
- For back positions, the holder should hold the disc as high as they can.
- The runner calls the end of the drill
- There’s no specific target duration since energy expended will vary with the disc holder’s pattern and the intensity of the runner

Leave a comment