
Items Purchased:
– Fly12 Sport Bundle (device, silicone case, lens protector, duo mount, handlebar mount)
– 2x handlebar mount
– 256GB SanDisk High Endurance microSDXC card
When Purchased: March 2025
Total Amount Paid: $425.27
How I Got Here
A few months ago, some friends talked about getting vehicle dash cams because of some videos posted to the local Reddit sub. I ended up getting one (Viofo VS1), and I’ve enjoyed the little extra peace of mind and the ability to record some of the ridiculousness I encounter as a Portland driver. I’ll write a review of that cam at some point.
About a month ago, I was on a bike ride when I started thinking about all the close calls I’d had while riding and made a mental note to check options for attaching a GoPro or other action cam on my bike. But lo and behold, there are companies that make devices for this exact purpose.
After looking at several options, I bought the Cycliq Fly12 Sport.
- I was only interested in a front-facing camera that could be easily mounted on handlebars
- I did not care about radar or other technologies to detect surrounding objects
- It had to support at least 2560 x 1440 video resolution
- It had to support manual and automatic locking of video files for incidents
- It had to operate using my desired configuration for at least three hours
- It had to be easily swapped between multiple bikes
- I did not want a video display screen
Based on those criteria, the Fly12 Sport seemed like a better fit for me than various Insta360 models, various GoPro models, the Garmin Varia, and the Fly6 Pro (also from Cycliq).
Specs
- Size: 33mm x 55mm x 82.1mm
- Battery Size: 3000mAh
- Stated Battery Life:
- Camera Only: 7 hours
- Camera with Light in “Organic” Mode: 6.5 hours
- Viewing Angle: 135°
- Video Modes:
- 2880 x 2160 (4K/2160p) at 24 FPS
- 2560 x 1440 (1440p) at 30 FPS
- 1920 x 1080 (1080p) at 30 FPS
- Supports HDR
- 1920 x 1080 (1080p) at 60 FPS
- 1280 x 720 (720p) at 120 FPS
- Image Stabilization: 6-axis
- Water Rating: IP56 (protection from significant dust and powerful water jets from all directions)
- Max Light Brightness: 400 Lumens
- Light Modes (all have High and Low brightness)
- Organic (semi-random)
- Solid
- Pulse
- Flash
- Off (camera only)
- Storage: Up to a 256GB microSD card
- Connector: USB-C
- Weight: 148g
Battery life is a major factor for me. My rides normally run 1-1.5 hours, and some of the action cameras I checked out (like the GoPro Hero 12) only promised around 90 minutes of recording at 4K and up to 2.5 hours at 1080p. Cycliq’s website claims the Fly12 Sport can record 1440p video at 30 FPS for 7 hours with both image stabilization and the light disabled. However, manufacturer battery life claims are often…optimistic, so I tested it in the real world using my preferred configuration after a full charge.
- Video Mode: 2560 x 1440 (1440p) at 30 FPS
- Image Stabilization: Enabled
- Light Mode: Off
- Ride Duration: 1 hour, 3 minutes
- Battery Capacity After Ride: 90%
Granted, this is a brand new battery, but an indicated 10-hour life with the same video mode as Cycliq’s tests and image stabilization enabled on top of that was a pretty nice surprise. That suggests I’ll probably only have to charge it every few rides as long as I keep the light off.
Mounting
My goal was to mount the camera as close as possible to the center of the handlebars to minimize frame shift during steering. I initially mounted the camera perpendicular to the ground (using a level), but after looking at footage from a couple short test rides, I pointed it down slightly. I prefer seeing more of the ground close to my front wheel to seeing more sky.
A note: if you get the Fly12 Sport Bundle, it comes with both a duo mount and a handlebar mount. I apparently overlooked that and thought it only came with a duo, so I ended up with an extra handlebar mount.
Trek FX3
I used the handlebar mount positioned as close as possible to the stem so it could grip the thickest section of the handlebar. The mount is a 2-screw that seems to be made specifically for that size, so if I tried to position it on an even slightly tapered section, I couldn’t tighten it enough to get any real grip.

Cannondale CAAD13
I use my computer with this bike, so it required the duo mount.
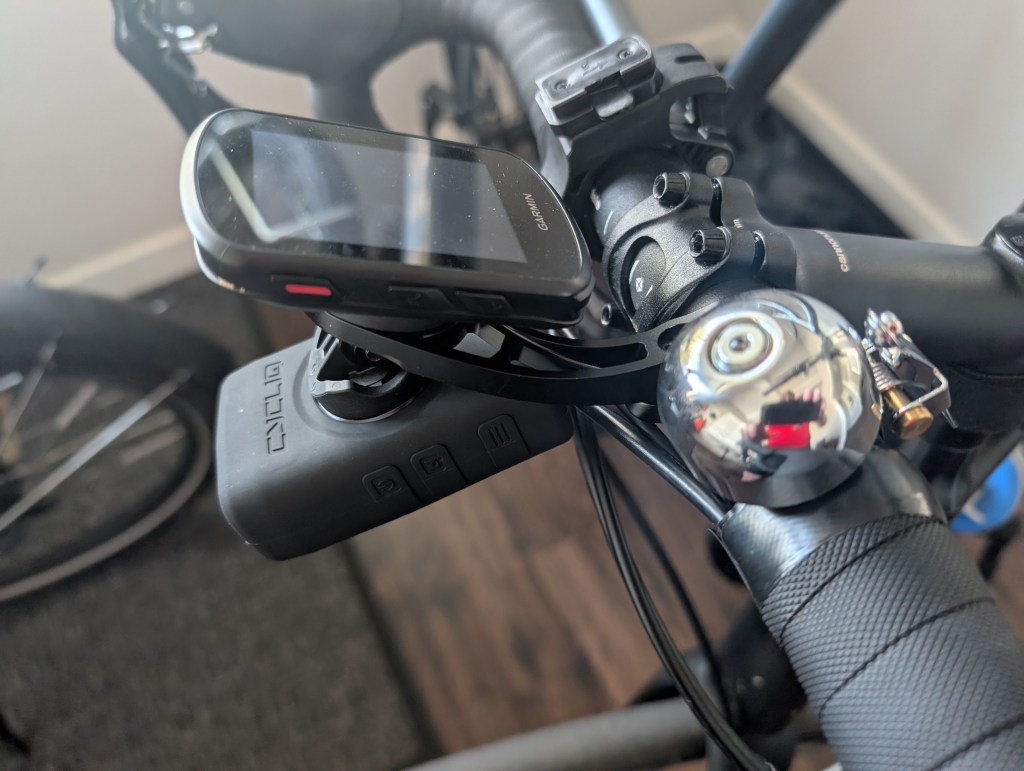
The mount has more of a skeleton design than the standard Garmin one (I assume to please the gram-counters), but it feels adequately rigid to me, and the connection between the Garmin computer and the Cycliq mount is actually tighter than the Garmin mount. Since the handlebars on the CAAD13 don’t taper, I was able to put it wherever I wanted, so I again placed it so the camera would be as close to center as possible.
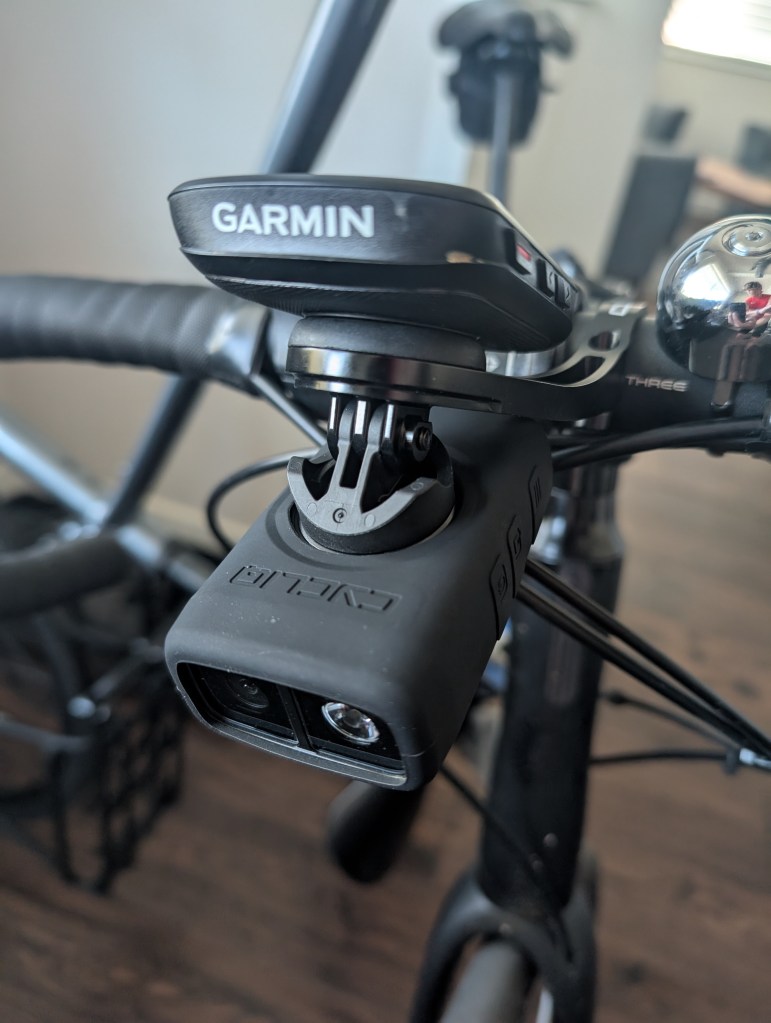
The duo mount comes with a universal adapter than attaches via interlocking plastic and metal tabs tightened down with a screw. I was a little concerned because it stayed fairly loose as I kept tightening it, but once I torqued it pretty hard, the mount/camera became very stable.
Just like any computer mount, it took a little trial and error to find the angle I liked most while riding, but once I found that and tightened, the mount stayed securely in place.
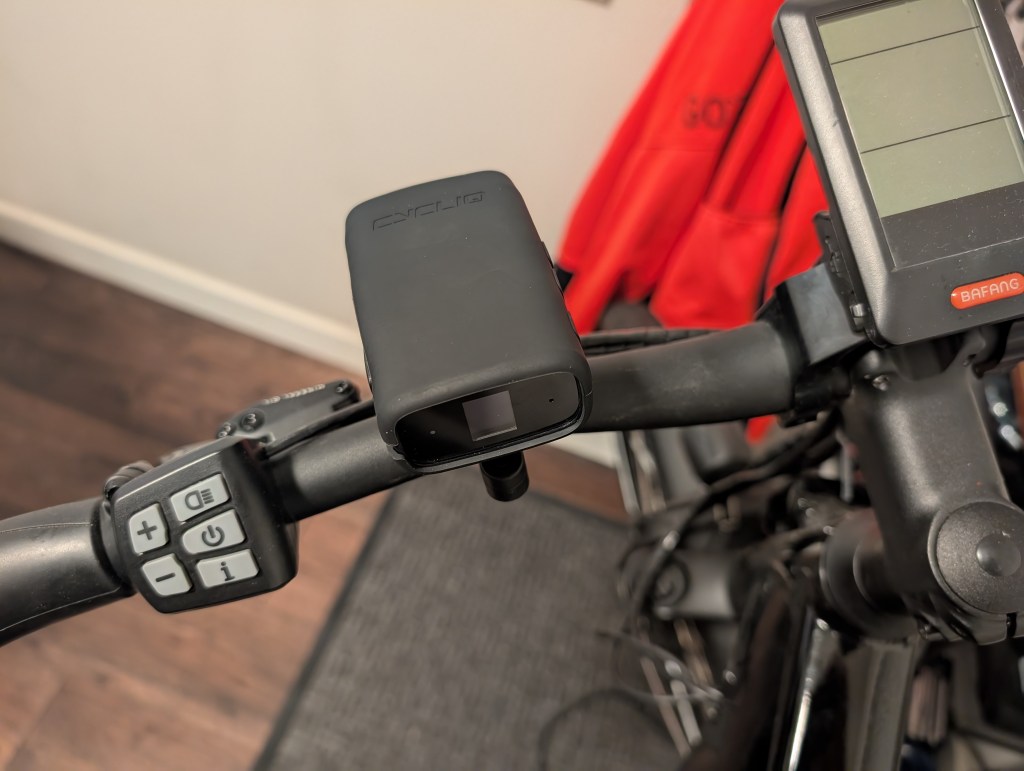
Cannondale Adventure Neo Allroad S
Since the handlebars taper and the ebike display takes up a lot of space around the stem, I had to mount this one farther outside with the provided rubber spacer. Even tightened down as much as I was comfortable doing, I can still rotate the mount around the handlebars with a moderate amount of force. But I don’t think it will experience a lot of direct rotational forces (mostly vertical?), so I’m hoping this configuration is enough to keep everything in place.
Setup
CycliqPlus is available as both a mobile app (Bluetooth connection) and a desktop app (wired USB-C connection). Either can be used for basic settings like the video mode, selecting which light modes will be available in the on-device menu, and formatting the microSD card for initial use. However, two important functions can only be done using the desktop app:
- Upgrading the firmware. Every time the device is connected, the app checks for a newer firmware version. If one is available, it prompts to update.
- Viewing and transferring videos. I was unable to see video previews or even a list of locked files using the mobile app. All video management must be done using the desktop app.
And frankly, all that makes sense. The bandwidth of Bluetooth makes it essentially unusable for transferring files as big as the ones being generated, and trusting Bluetooth for things as important as firmware updates is asking for trouble. My vehicle dash cam primarily supports video management via 5G WiFi (much faster than Bluetooth), and it’s slow enough to be a minor pain.
After the initial “Oh, I can change that?” phase, I uninstalled the app from my phone. Firmware updates and video transfers are probably going to be my only true management interactions with the device going forward, so I only need the desktop app. I you don’t have a Windows or Mac laptop, I believe you’ll have to manually transfer the files to your phone/tablet/Chromebook, either straight from the camera using a USB-C cable or removing the microSD card from the camera and using an adapter.
Controls
Once the basic settings/options are defined, the device is controlled via the three physical buttons on the side of the device. From forward to rear:
- Power button
- “Q” button
- Function button
You can guess what the power button does. The only thing worth noting is that it seems to take a full three seconds to register, which is probably intentional: don’t want to accidentally turn it off while riding or on while it’s in a gear bag.
The Q button is used after incidents:
- Quickly pressing the button signals an incident just happened. See the Incident Detection section for details of what happens.
- Holding the button for three seconds will cause the device to save a still photo in addition to the video it’s recording. This is so you won’t have to take screencaps from video later if your phone was broken during the incident (or you want separate pictures for any reason).
The function button is the primary way of interacting with the device. A short press causes the main menu to display on the small screen on the rear of the device. Additional short presses cycle through the settings, while long-presses cycles through the options of the displayed setting (light modes, mounted above or below handlebars, etc.).
Incident Detection
An incident is processed in response to one of the following conditions:
- The Q button is short-pressed
- The device is tilted more than 60° from vertical for more than five seconds. So essentially if the bike is laying on the ground.
When an incident is indicated, the device locks both the currently recording file and the preceding file. This is to account for an incident happening immediately before a new video file is started.
Automatic Incident Detection is enabled by default, and I don’t know why anyone would disable it.
Video
As noted in the Specs section, the Fly12 Sport has several video modes. I think one could make a case for all of them except 720p (just…why?). Like all video, it’s about tradeoffs: higher resolution and FPS mean more detail at the cost of shorter overall recording duration (for a given storage capacity) and shorter battery life.
I’ve configured mine for 2560 x 1440 at 30 FPS because I think that’s a good balance. It’s the second-highest resolution available and seems more than sufficient to capture details that can be used to determine fault in a scenario. As a digital video nerd who has seen the progression from 480i (720 x 480) to 8K (7680 x 4320), 2560 x 1440 is very good. Higher resolutions also require more processing power, which often affects battery life.
All that is nice, but nothing beats seeing an actual video, so here’s a clip from a ride to my gym to give you the general idea. If it’s pixely, close and reopen it. However, Google downgrades all high-resolution video clips uploaded to Drive to 1080p, so if you want to download the 157MB in original quality, here you go.
I can confirm the video file sizes on the website are correct: 5 minutes of 2560 x 1440 at 30 FPS is 1.17GB. The true usable capacity of the 256GB card is 238GB (yay for confusing storage notations!), so my card should hold just under 17 hours of footage. When it reaches that limit, the oldest files will be deleted to make room for the new ones (while leaving any locked ones intact).
All that said: if everything keeps working like it has so far, I may tick the video setting up to 4K to see what that does to file sizes and battery life. If I still get 7+ hours per charge and 12+ hours of video storage, that seems like good tradeoff.
There is a basic editor in the desktop version of CycliqPlus so you can take screenshots and cut important (or funny) parts of videos for easy sharing.
Light
Not gonna lie: I did almost no testing on this since I’m not planning on using it. I have other handlebar-mounted lights that are much brighter and have longer battery lives, so I’m going to continue using those in tandem with the camera. I personally consider 400 Lumens to be underpowered for night riding (even in the city), but I may use pulse or flash if dusk is falling at the end of a ride.
Small Things
- The fit of the device into the universal mounts is very snug. Maybe even too snug initially. The first time I put it on the duo mount, I stopped to make sure I wasn’t going to break something. It has loosed up slightly after being used a few times.
- Because a moderate-to-heavy amount of force is required to seat the camera in the mounts, I often accidentally press buttons. It wouldn’t be a big deal if I always used the same orientation (above or below handlebars), but I power the camera on before putting it on my road bike to switch the orientation because it’s difficult to see the screen once it’s on the duo mount.
- The silicone cover is…fine. Its main tasks are to add rain protection and absorb the shock of a drop, and it seems to accomplish those. But the unbeveled corners make it feel a little cheap to me.
- Removing the microSD card sucks. The slot is so close to the edge of the compartment that it seems unlikely any adult human finger could get a grip on the ridges of the card. You may be able to manage if you have long fingernails, but I ended up using needle nose pliers.
Conclusion
I think I made the right choice. The Fly12 Sport is made to do exactly what I want, and everything from the shape of the case to the controls makes it feel like a solid second-generation device. The video quality is more than adequate for my purposes, the mounts are solid, the battery life is impressively long, and it’s nice to know I have a backup handlebar light if the need ever arises.
And it accomplishes my primary goal: giving me the same small peace of mind that I get from the dash cam in my vehicle. Here’s hoping I never have to use video from either.

Leave a comment