Background
DNS is the service that translates what you type into the address bar of a browser (like google.com) into a format your device can use to access the destination (a specifically-formatted number called an IP address). Without that translation, nothing on your device can resolve names/URLs, which essentially means that nothing that relies on remote resources will work.
By default, when a device like your laptop or phone connects to a network, the associated network hardware tells the device where to look for DNS. This post describes how to customize that configuration.
Why
By default, ISPs (internet service providers) like Comcast, Quantum Fiber, and others configure customer gear (like routers) to use the ISP’s own DNS servers. This makes sense from their perspective: people get angry when their internet service doesn’t work, so the ISP wants to have as much control over the quality of their service as possible. However, I think there are two reasons to deviate from the default configuration.
Functionality
Simply put, I have found ISPs aren’t very good at maintaining DNS servers. Years ago, I personally experienced an outage whose root cause was a problem with my ISP’s DNS servers, and several of my friends were impacted by a similar event yesterday (which is why I’m writing this today).
Other companies are very good at maintaining public DNS servers. The two I personally like are Google and Cloudflare, but if you search for “public DNS server IP,” you’ll find others. I configured all my devices to use Google years ago and have avoided significant outages on multiple ISPs.
Privacy
This is a minor factor, but your ISP is uniquely able to associate a given DNS query with your account/identity because they have the ability to record 1) the account to which the originating IP address was assigned at the time of the query and 2) the query on the DNS server, including originating IP address. The realities of volume mean this is unlikely to happen, but it’s technically possible.
The reality is that if you want some measure of true privacy, you should be using some sort of VPN that prevents your ISP from monitoring any of your traffic. There are a bunch of good ones, and I like PureVPN: it’s easy to use, fast, and they offer both client-side (install on your devices) and router-based (install on your router) solutions.
How
I’m going to describe the process for what I think is the most common home network configuration: dynamic DHCP everywhere with ISP default settings. If you know enough to set up your own non-router DHCP server or are manually configuring static IPs for internal devices, you shouldn’t need my help.
The screenshots here are from the Actiontec C300A router I got with my Quantum Fiber service. If you have a different device, things might look a little different, but they should be similar enough that this gets you where you need to go. For Quantum Fiber devices specifically, here is the relevant support page.
To access the router’s configuration website, look at the sticker on the side or bottom and type the IP address (probably something like 192.168.0.1) into a browser on your home network. The credentials should also be on the sticker if you haven’t changed them. Again, for Quantum Fiber devices, see the instructions linked above.
Step 1: Updating the DNS Configuration of the Router Itself
By default, your router both 1) performs DNS queries for its own functions and 2) forwards queries from devices connected to your home network. It uses the DNS IP addresses configured on the device itself. To change those, I went to:
Advanced Setup -> WAN Settings -> Select the IPv4 DNS type
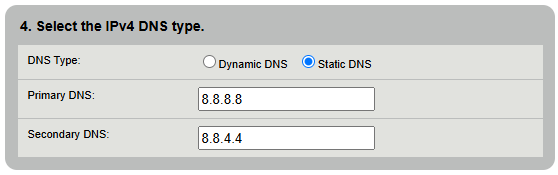
I then chose Static DNS and entered the two IPv4 IP addresses listed in Google’s documentation.
I then clicked Apply to save the changes.
Step 2: Updating the Router’s DHCP Configuration
This step isn’t necessary for my router because once I updated its internal configuration, it started using those Google IP addresses everywhere. However, if you’ve updated your router, and your devices are still using other DNS settings after a reboot (instructions for checking), you’ll need to perform this step.
Advanced Setup -> LAN Settings -> DHCP Settings -> Set the DNS servers allocated with DHCP requests
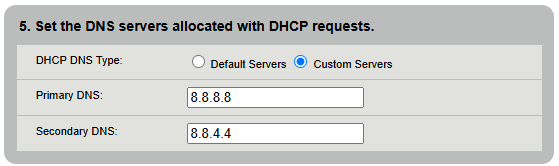
Choose Custom Servers and enter the two IPv4 addresses you want to use.
Click Apply to save the changes.
After these changes, all devices on your home network should use the DNS IP addresses you’ve specified, bypassing the ones managed by your ISP.

Leave a comment