Year Originally Released: 2025
Version Played: Avowed Standard Edition (via Game Pass)
Platform/Hardware: Xbox Series X (all button notes are for an Xbox controller)
Primary Game Genre: Role-playing
Player Perspective: First- or third-person
Video: Official Launch Trailer
Hours Played: 74 (one playthrough)
Achievements: 66% (33/50)
Gamerscore: 72% (715/1,000)
My Favorite Thing: How “friendly” the game is
My Least Favorite Thing: Companion combat effectiveness and requirements
Why I Started Playing It
I saw the trailer a month or two before launch while looking around in the Xbox store, and I assumed I wouldn’t like the game. I can get onboard with a hack and slash/button masher game like Diablo, but I haven’t enjoyed a melee-primary combat game since Rune back in 2000 (including Sleeping Dogs). The trailer featured a fair amount of melee combat and spellcasting, and I’m usually more of a “That’s nice, now how do I shoot things?” player.
However, a friend played it shortly after launch and repeatedly told me how much fun she was having. The more she played, the more she was convinced I would like it. It was “free” on Game Pass, and I felt (and feel) like I’ve nearly run out of good open-world narrative-driven games, so I decided to give it a shot after a couple major patches had been released.
Story
You are the envoy, an emissary chosen by the emperor of one of the largest nations in the world to investigate a strange illness. The empire is in the process of expanding to a new island called The Living Lands that has always been a haven for people who, for various reasons, wish to live outside the influence of any real form of organized government. Along with the expected political difficulties, reports have started coming in of a disease in the wilderness that seems to take over whatever it contacts (plants, animals, people, etc.) and turn the host very aggressive.
The main story centers around investigating the disease and making decisions about how to deal with it. Those decisions often both have serious immediate consequences and shape the options of subsequent decisions. Each region is a piece of the constantly-changing political situation that has to be managed throughout the game. Along the way, you recruit four companions who have their own backstories and quests.
In addition to main and companion stories, there are many random NPCs in the world who have quests to give. These range from simple fetch quests to multi-stage arcs that weave into the main story.
Gameplay
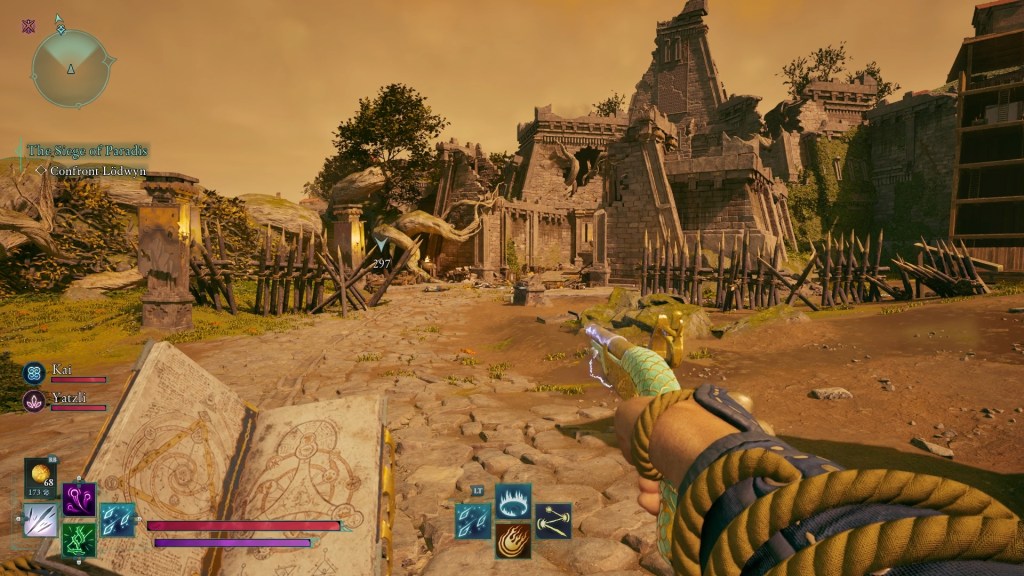
Avowed is what I call an “open-area” game as opposed to truly open-world: instead of being able to continuously walk/sail/drive/fly from any point in the world to any other point (Fallout, Red Dead Redemption, Assassin’s Creed, GTA, etc.), there are regions that are open-play, but one must use specific travel points or use fast travel to go between regions (Borderlands, Starfield, The Witcher 3, etc.). This design has made other games feel small/linear (The Outer Worlds), but the regions in Avowed are large enough that they still feel like sandboxes with open possibilities.
The map is fogged over, and exploring it reveals a small radius around the player. Not all areas can be revealed: there are crevasses, mountains, cliffs, and other areas that players simply can’t access/clear. There are fast travel beacons scattered around the world, and once one has been unlocked, they can be used in the main map; no need to unlock fast travel via the story/skill tree or go to a specific place to initiate. Hallelujah.
The regions play a major part in both the gameplay and story. The first two are relatively flat, easy to traverse, and generally visually pleasant. The second two are arid/barren and have far more varied terrain, which means reaching a desired spot might require finding a non-obvious path. The environment also affects combat: like many games, electric attacks spread to additional enemies in water, and water can be frozen to reach additional areas. Volatile spores can be also shot to drop down on enemies. Each region has its own culture and form of governance, and keeping those in mind while dealing with quests and characters in that region can be useful.
The character build system is a pretty standard attribute/ability combo:
- Attributes are multipliers that determine how effective you are at various things. Constitution determines base health/hit points, Might determines base damage, Perception determines base critical hit chance and range, and so on. These range from 0 to 15, and it is not possible to max all of them out with the current level cap (30).
- Very important: the increases granted by each point in an attribute are subject to diminishing returns. Increasing Might from 2 to 3 increases Damage several percentage points, but increasing from 11 to 12 only increases it 1%. Since it’s not even close to possible to max out all attribute categories, spreading points across several (if not all) categories maximizes value unless the goal is a very specific build.
- Abilities come in two types:
- Active – Enables the ability to activate a specific action or bonus for a limited amount of time. Special attack, temporarily healing of all party members, etc.
- Passive – Permanently enables a buff or functionality. Does not require specific activation.
The same attributes and abilities are available to all characters. While players choose the backstory of their character, specialization is done via the combination of character build and gear. There are no character-specific skill trees like in Diablo, Borderlands, or Dragon Age.
Continuing the trend toward flexibility, it is very easy and cheap to try out new builds. At any point, all skill and character points can be reset for a cost that is tied to character level: early in the game, it’s 100 of the basic currency (skeyts), which did seem a little daunting at the time. However, after I got my head around the game’s flavor of resource management and played a little more, the reset cost was never a barrier, even as it scaled up to thousands of skeyts. I probably did it 8-10 times trying out different combinations after finding new skills and gear.
Important context: I played the game on the Easy difficulty setting. I primarily play games like this for the story, and I like having the flexibility to mess around with all kinds of builds without the real risk of death (outside of big fights/bosses). My only deaths were due to accidental falls.
Controls
I love a lot of things about Obsidian games, but controls (specifically fluidity and weapon feel) have always been a minor pain point. Fallout: New Vegas is a top contender for my favorite game of all time, but even for its era, movement was artificial, and weapon feel was clunky. The Outer Worlds was obviously more modern, but playing it back to back with an FPS as polished as Borderlands 3 or even more arcade-y games like High on Life or Journey to the Savage Planet really highlighted the differences/deficiencies.
Fortunately, Avowed mostly breaks free of this lineage. Running, jumping, and manteling (yay!) feel fluid and natural. Being hit by an enemy or trap has a decent physical/visceral feel as opposed to just sliding across the floor. Melee weapon swings feel/look more like they transfer weight as opposed to just being done by an independent appendage (though the reaction of the enemy model is still basic). When a movement or mechanic feels artificially slow (such as switching weapons), it’s probably a design decision that can be adjusted via abilities, attributes, or gear bonuses.
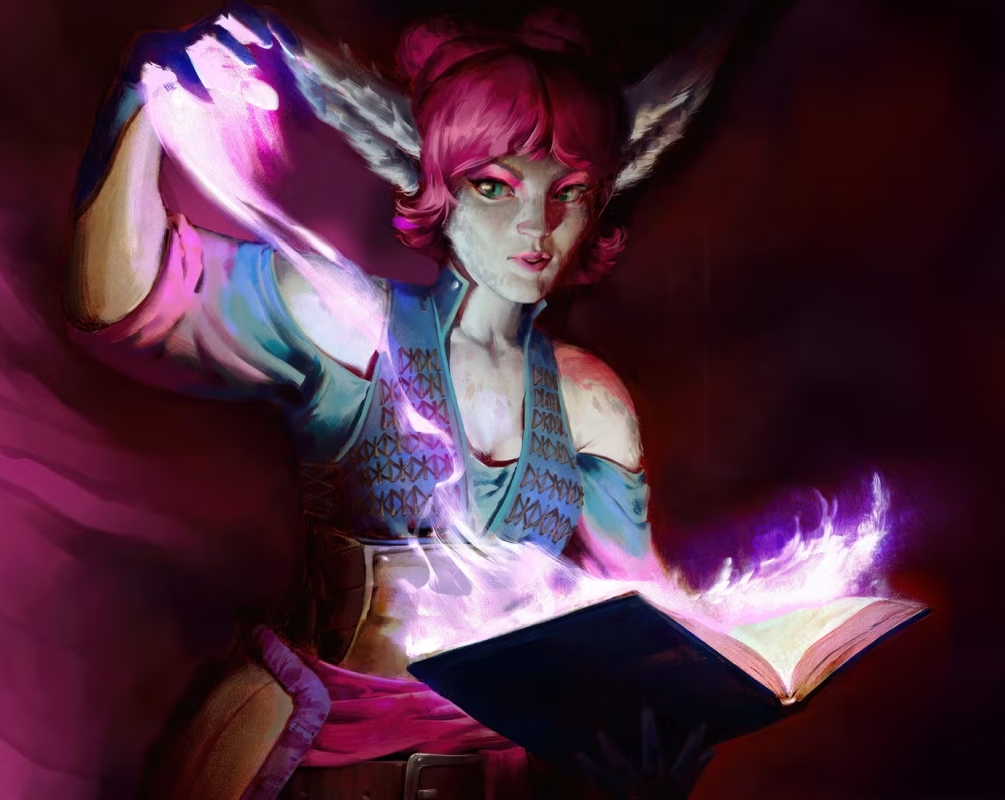
Combat
Avowed has one of the most flexible combat systems I’ve played. It has the main four main types of damage found in most fantasy RPGs:
- Melee – As basic as it gets: swinging swords, axes, maces, daggers, spears, and other types of one- and two-hand weapons. Or simply swinging away with bare fists.
- Spells – Offensive and defensive spells that can be “read” out of a grimoire (equipped in a loadout) or learned via skill tree to use without the need for a grimoire. More on that below.
- Ranged Kinetic Weapons – Primarily bows and firearms. But this isn’t Call of Duty: all guns are semi-automatic and must be reloaded after every shot.
- Ranged Magic Weapons – Wands.
One of the many player-friendly touches is support for dual weapon loadouts. Each loadout consists of two slots, one for each of the player’s hands. A quick tap of the Y button switches between them. This allows the player to have up to four weapons quickly available during combat (larger melee weapons take up both slots of a loadout). After trying a few options, I ended up with a primary ranged loadout (pistol, grimoire) and a secondary melee loadout (one-handed melee weapon, shield). The primary allowed me to do long-range individual and long- and medium-range crowd control, and if everything went to hell, I switched to secondary and started swinging.
There is also a bit of choice between real-time and turn-based combat using a system that reminds me of Dragon Age games. For the most part, melee, ranged kinetic, and ranged magic weapons are real-time: point at the enemy, hit the attack button, and it happens right then. However, spells, active abilities, and restorative inventory items can be accessed via a radial that completely pauses combat while it’s open. Multiple spells and activities can be activated/stacked while in the radial, and skills can be unlocked to further extend that ability. Players who prefer a more turn-based combat model can make a build that focuses on that pause-and-stack functionality.
But if, like me, you prefer your combat real-time, the default Xbox control scheme allows assignment of up to four actions to the directional pad. This was the most malleable part of combat for me over the course of the game: as I unlocked/tried additional active abilities and met more companions, I constantly changed what was assigned to those four slots. Radial usage was mostly limited to restorative items. The combination of the directional pad and an equipped grimoire results in eight easily-available skills and abilities.
Gear
Similar to most games with upgradeable unique gear (AC: Valhalla, The Witcher 3, Cyberpunk 2077), by the middle of the game, looting becomes much more about gathering items to break down for crafting materials instead of the anticipation of picking up a new favorite toy. Whether that’s a good or bad thing depends on personal preference.
In the first quarter or so of the game, I tried a variety of weapons and armor. The only categories that held no interest for me were 2-handed weapons (shields are actually quite useful in this game) and light armor (I melee in a crowd too often). My first unique item was an axe, and I used it as my primary melee weapon for probably 90%+ of the game.
With very few exceptions (click for minor spoiler), Avowed does not withhold its best gear until the last few hours, which I think is great. As a person who has zero interest in endgame grinding/farming, it’s always a bit of a letdown when I only get to use my dream weapon for the last few hours of a big game. Instead, I prefer non-upgradeable gear being tied to my overall level (Borderlands) or non-unique upgradeable gear being almost as good as unique items (Fallout). Avowed rides a pretty good balance by frequently handing out a wide variety of unique upgradeable gear.
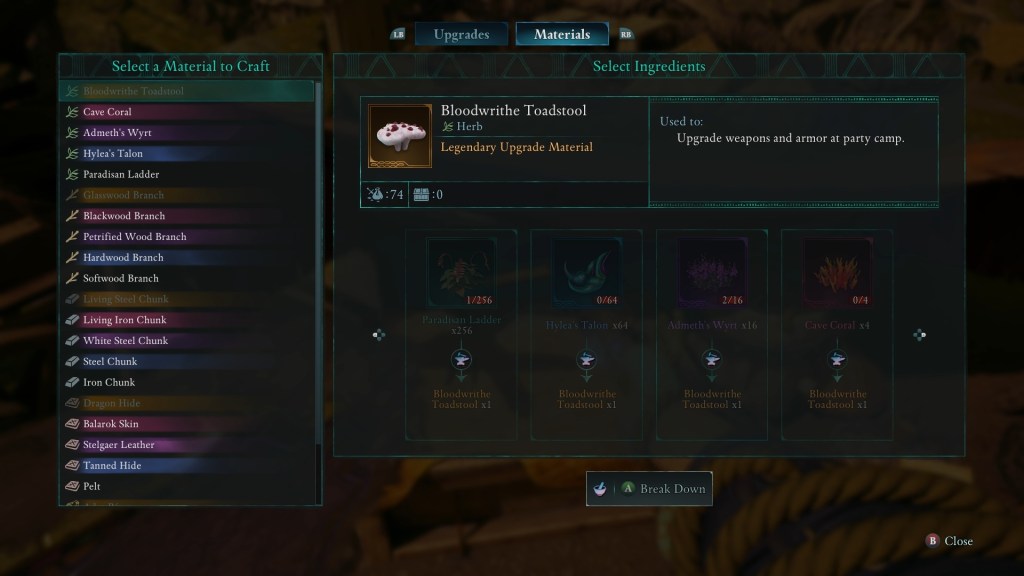
Resource Management/Crafting
Gear is upgraded using a combination of common raw materials (stone, pelts, wood), money, and level-specific resources that act as natural limiters for how far items can be upgraded at various points in the game. In the first region, it’s an herb called Paradisan Ladder; in the next region, it’s Hylea’s Talon. Because resources don’t respawn, there is a limit to how many crafting materials can be gathered in a region, and the crafting multiplier means it’s very difficult to significantly over-level gear before getting to the intended area.
Resources are hierarchical and can be converted up and down at camp. Example: the base armor material in the first region is a Pelt. This can be used to upgrade Common tier armor. However, it can’t be used to upgrade Fine armor. Instead 4 Pelts must be converted to 1 Tanned Hide at the upgrade station in camp. All crafting materials follow this same model.
For unique items, there is an additional material: adra. It’s a very important resource in the world of Avowed, and it is correspondingly rare/expensive. Once I got more than a couple unique items I wanted to keep upgrading, I had to start breaking down other unique items I wouldn’t use.
Early in the game, I sold everything I picked up because having a bunch of raw materials didn’t mean much if I didn’t also have the money for the upgrades, and I was routinely picking up gear that was significantly better than what I’d been using, so upgrading didn’t make sense. About the time I started using Fine gear, the combination of a decent amount of savings and the need for Fine crafting materials meant I sold Common gear and broke down Fine gear. I mostly stuck to that methodology the rest of the game: break down items of the current tier, sell everything else.
Companions
There are four companions in Avowed, and all are recruited as part of the main story (cannot be missed/skipped). They are generally associated with specific regions and phases of the game, and they have their own quest lines that unlock additional character bonuses.
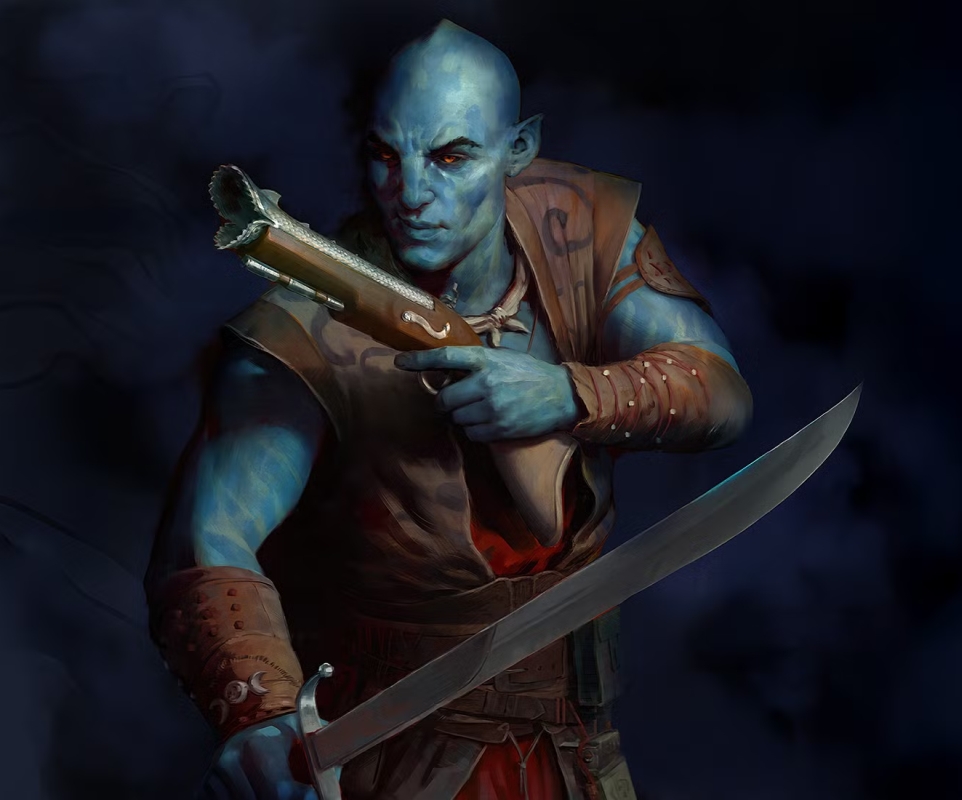
Kai is the first companion encountered shortly after the intro, but he is most involved in the main story in the third region (Shatterscarp). He’s a fighter/tank whose primary weapon is a gun that does fire damage. His people (Rautai) are known for being resilient and tough, and his friendship quests are related to the regrets he carries from his military service.
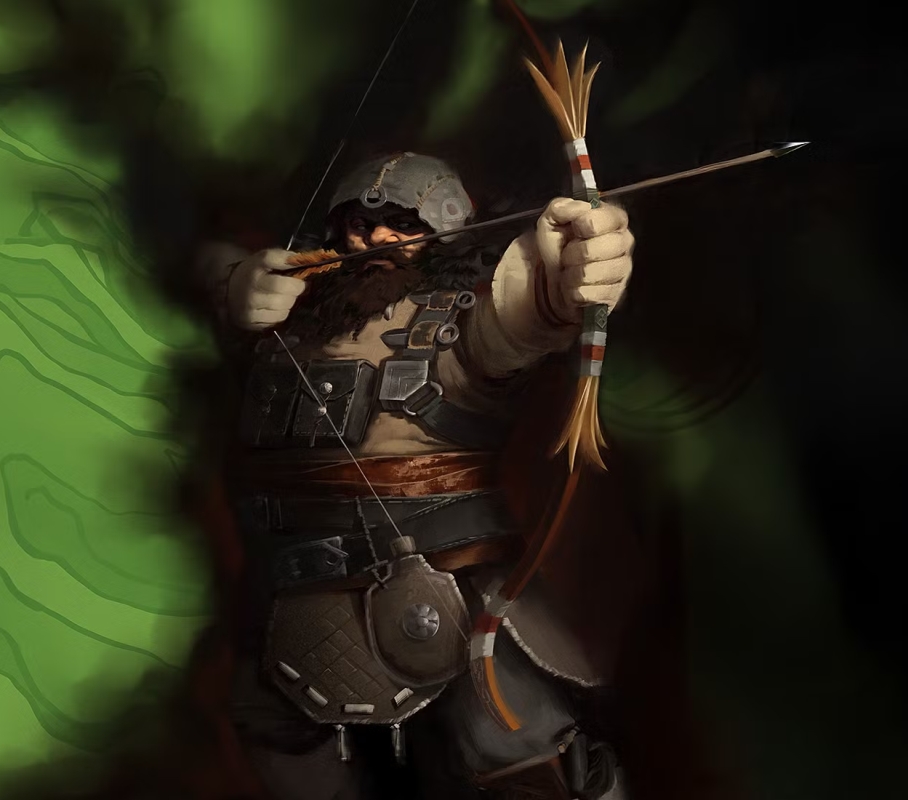
Marius is the second companion, and similar to Kai, while he is recruited in Paradis, he most involved in the main story in a later region of the game (Galawain’s Tusks). He’s a ranger whose primary weapon is a bow, but the Ranger skill tree also has rogue options. His people (Pargrunen) are dwarves who are known for being stubborn and independent, and his friendship quests are related to his family history and feeling of alienation after choosing to leave his clan.
Giatta is the third companion, and her primary involvement in the main story happens in the region where she’s recruited (Fior). She’s a human wizard with an emphasis on healing and defense spells. Her friendship quests are related to helping her process and investigate her parents’ tragic deaths that were caused by the same magic she has chosen to study as her life’s work.
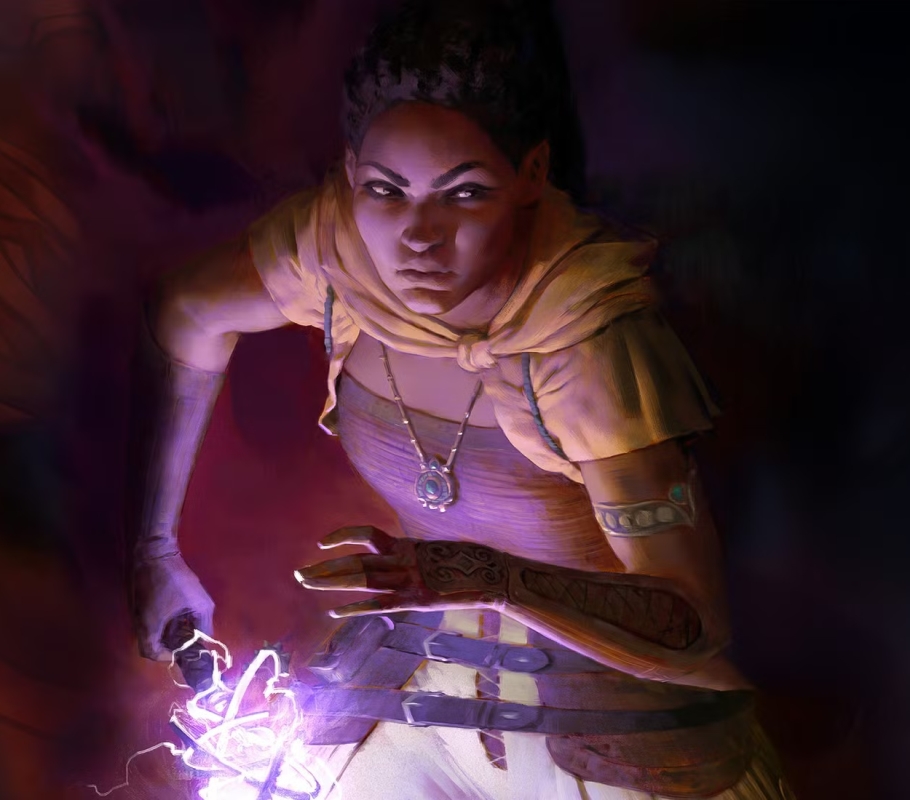
Yatzli is the fourth companion, so her involvement in the main story is in the last two regions. She’s a wizard with a focus on offensive spells. She’s a hearth orlan, a race that is covered in fur and relatively short in stature. Her friendship quests are related to the exploration of ancient ruins and the future focus of her studies.
Some context: companions don’t do a lot of damage. This isn’t Fallout or Dragon Age where properly built and equipped companions can deal a significant percentage of the party’s damage. Out of curiosity, I would sometimes let my companions take on small low-level mobs, and it was enlightening to see the enemy health bars slowly click down when I knew I could one-shot them. Adjust your expectations/play style accordingly. For companion combat combos:
- Kai was an auto-pick because having a tank in the party makes games like this a lot easier, and I played a ranger.
- I couldn’t find a way to make Marius very useful. Even with a build similar my ranger, his bow damage output was a fraction of mine, and his rogue abilities put him into enemy melee range without Kai’s hardiness.
- Since I played on Easy, I didn’t really need Giatta’s healing, so I only took her along when I was doing a quest that involved her.
- Yatzli was my standard second pick late in the game because of her ability to do area of effect magic damage. It wasn’t a lot, but she could do a little crowd control or apply effects that stacked with my attacks.
Final Thoughts
Avowed is one of the better gaming surprises I’ve had in a while. The combat is flexible and fun, the characters are interesting, the main and companion stories are compelling, and it is generally very friendly to the player. Fast travel is available almost immediately and can be done in the main map, fall damage is very forgiving, sprint duration is unlimited, there are chests and other stashes everywhere to reward exploration, and companions can be walked through so they don’t block doorways. Decisions made during the main story significantly affect the outcome of the game, and your relationships with your companions dictate some of their abilities. The game also looks absolutely gorgeous; it’s a showcase of what can be done with the Unreal 5 engine on console hardware from 2020.
If this is any indication of what we can expect from Obsidian after being acquired by Microsoft, then I’m very excited for the future. I plan on purchasing a DLC season pass if one becomes available.
Tips/Things I Wish I’d Known
- Ranged kinetic weapons have the same “hold the button for a power attack” mechanism as melee weapons.
- Any item can instantly be transported to camp storage any time by pressing the X button.
- Any item can be broken down to crafting materials in the inventory by highlighting the item and holding the X button.
- As soon as you have a semi-comfortable amount of money, buy every lock pick from every vendor. They’re cheap, and you’ll go through more of them as you progress (some end-of-game chests require 15+ picks).
- Chests and other non-corpse lootable items emit a high-pitched “tinkling” or chime sound. I found so many hidden chests because I heard that sound and honed in on it. Make sure your audio mix allows you to easily hear it.
- Companions can grant the player two points in specific attributes during one-time training sessions. To initiate these training sessions, exhaust all dialogue options with every companion at camp. Some cannot be initiated until certain events/stages of the game.
- See the Spells and Gear Upgrades section below
Spells
The spellcasting progression system is kind of convoluted, but this is my best attempt at explaining it.
In order for a player to be able to cast a given spell, they must be capable of casting that spell’s level. I find that terminology easy to confuse with player level, so I’m going to call it a “tier.” The spell tiers are 1, 5, 10, 15, and 20. Tier 1 spells are unlocked for all players very early in the game, and subsequent tiers are unlocked via the Grimoire Mastery ability in the Wizard tree. Each grimoire has a tier (matches the tier of the most powerful spell in it), and a player cannot equip a grimoire of a given tier until they have unlocked that tier using Grimoire Mastery.
To actually cast a spell in combat, the player must have either a grimoire equipped that includes the spell (a grimoire in the inactive loadout does not count) or spent at least one ability point on the spell in the Wizard ability tree.
- If the spell is enabled via an equipped grimoire, it can be cast by focusing on the grimoire (left trigger), then pressing the button associated with the spell from the menu that pops up (A, X, B, or Y).
- If the spell is enabled via points spent in the Wizard ability tree, it can be cast from the combat radial (hold LB). Since it is available on the radial, it can also be assigned to one of the four global quick slots of the D-pad.
Not confused yet? Cool. Each spell also has three ranks: 1, 2, and 3. This determines how powerful the spell is. All spells are cast at rank 1 by default, but an individual spell’s rank can be increased by points spent in the Wizard ability tree, having an grimoire that includes that spell actively equipped, or gear bonuses. Without accounting for gear bonuses:
- If a spell is cast using a grimoire with no points in the Wizard skill tree, it will be rank 1.
- If a spell is cast using a grimoire with 1 point spend in the Wizard skill tree, it will be rank 2.
- If a spell is cast using a grimoire with 2 points spent in the Wizard skill tree, it will be rank 3.
- If a spell is cast using a grimoire with 3 points spend in the Wizard skill tree, it will be rank 3.
- If a spell is cast with no grimoire and 1 point spent in the Wizard skill tree, it will be rank 1.
- If a spell is cast with no grimoire and 2 points spent in the Wizard skill tree, it will be rank 2.
- If a spell is cast with no grimoire and 3 points spent in the Wizard skill tree, it will be rank 3.
Note there is no bonus for casting a spell with a grimoire and 3 points spent in the Wizard skill tree. I ended up casting all my spells out of a grimoire (so I didn’t have to take up all my global quick slots with spells), so I never spent more than 2 points in any individual spell’s ability. But it’s definitely worth upgrading gear and spending points to cast frequently-used spells at rank 3 because it often makes them significantly more powerful.
Example: at ranks 1 and 2, Blizzard is moderately useful for crowd control and slowing enemies, but its effectiveness is limited by its 3-second duration. But at rank 3, that duration is extended by 6 seconds for a total of 9 seconds. That transforms the spell from a quick hit “hope I cast it in the middle of the crowd” to “cast it in front of me after pulling aggro and let the entire mob run into it to get slowed.” At the end of the game, the combination of a rank 3 cast of Blizzard and a rank 3 cast of Crackling Bolt was enough to knock down the health of small and medium mobs, if it not completely wipe them out (reminder: I played on Easy).
Gear Upgrades
There are four tiers for all gear and a fifth for unique items.
- Common (white)
- Fine (blue)
- Exceptional (purple)
- Superb (red)
- Legendary (orange)
- Only unique items can be upgraded to this tier
Each tier has three levels within it, and they are separate from the tier upgrades. AKA, upgrading to the next tier only does that; the item must be upgraded three more time before it is eligible for the next tier. An example:
- I pick up a Fine +0 sword
- That notation means it’s only a Fine sword and has not been upgraded within that tier
- I gather the appropriate crafting materials and upgrade the sword to Fine +1
- I gather the appropriate crafting materials and upgrade the sword to Fine +2
- I gather the appropriate crafting materials and upgrade the sword to Fine +3
- I gather the appropriate crafting materials and upgrade the sword to Exceptional +0
- And so forth
My Eventual Build
Warning: this section contains a lot of unique gear and details about it. Skip it if you prefer to explore builds on your own.
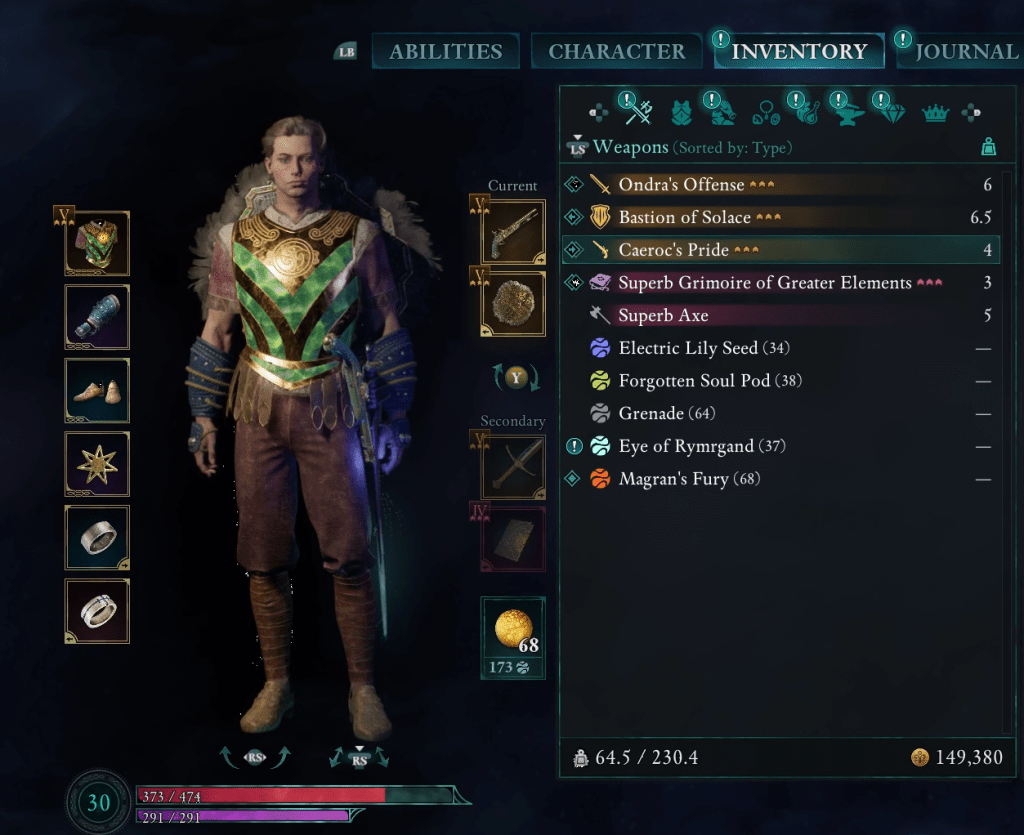
The focuses of this build are the primary weapons of each loadout: Caeroc’s Pride for primary/ranged and Ondra’s Offense for secondary/melee. The former was my second unique weapon (after Drawn in Winter), and it continued to be the most effective overall one-handed firearm for the rest of the game. I used Drawn in Winter for most of the game before the combination of Ondra’s Offense’s base physical damage and two ability points in Piercing Thrusts (+35% Power Attack damage with daggers, swords, and spears) finally outdid it.
Crit-based builds are normally staples of games like this, and Avowed is no exception. Early on, I put points into Perception, but eventually, a combination of other bonuses (including +5% crit chance and +2 Perception from Eyes of the Obscured) allowed me to respec character attributes while still retaining a 50%+ base critical hit chance. And since I ran a pistol as primary, every time I hit a vulnerable area (should be very easy for anyone who’s decent at shooters), it was an automatic crit. So with the Shocking Lash enchantment and the Ashfall’s Legacy ring, I was doing nearly 500 combined damage with most shots from Caeroc’s Pride.
Level 5 spells seemed to be the Goldilocks zone for me: with an upgraded Fine or better grimoire, net essence cost and cooldown were low (27 and 9 respectively at Superb +3), and with some essence boosts from Intellect, gear, and Harvest Essence, I could effectively cast a spell every 3-4 seconds on rotation as long as I could collect at least some essence from killed enemies. Then I got Spiritmender at the very end and had effectively unlimited essence because of my damage inflicted:maximum essence ratio.
My normal combat sequence:
- Crit an upgraded/leader from cover with Caeroc’s Pride to get the unaware damage bonus.
- Cast Tangled Root on that same enemy or the next most dangerous one. If it’s the same enemy, the poison damage normally either kills them or reduces them to a one-shot kill.
- Once multiple enemies start moving toward me (if they’re not already bunched together), cast Blizzard in their path so most or all get slowed.
- Cast Crackling Bolt (bounces 8 times) toward the enemies slowed by Blizzard. The combo of the two usually clears an entire small mob and and significantly decreases the health of medium and larger mobs.
- Just before Blizzard ends (9 second duration), cast Fireball into the center of the slowed enemies. This normally kills the rest of the mob.
- For any stragglers (or if I held one of the spells above for the fun of it), shoot with Caeroc’s Pride or swap to melee loadout and Power Attack with Ondra’s Offense.
- Armor
- Spiritmender (Legendary +3)
- 20% Damage Reduction
- 89 Additional Damage Reduction
- -35 Maximum Stamina
- -35 Maximum Essence
- Essence Draining
- Luminous Adra Battery
- Spiritmender (Legendary +3)
- Weapons
- Loadout 1 (ranged)
- Caeroc’s Pride (Legendary +3)
- 242 Physical Damage
- 260 Stun
- 20 Stamina Cost
- 3% Critical Hit Chance
- Thunder’s Fall
- Shocking Lash
- Superb Grimoire of Greater Elements +3
- -46% Ability Cost
- -40% Cooldown
- Caeroc’s Pride (Legendary +3)
- Loadout 2 (melee)
- Ondra’s Offense (Legendary +3)
- 185 Physical Damage
- 143 Stun
- 11 Stamina Cost
- 3% Critical Hit Chance
- Crashing Tide
- Freezing Lash
- Bastian of Solace
- 102 Block Efficiency
- 20 Stability
- 440 Parry Efficiency
- 35% Elemental Resistance
- Nandru’s Retribution
- Pargrun Resiliency
- Ondra’s Offense (Legendary +3)
- Loadout 1 (ranged)
- Other Armor
- Thirdborn Gloves
- +5% Power Attack Damage
- +3 Might
- Shoes of the Glimmering Merchant
- +5 Maximum Essence
- +3 Intellect
- +2 Perception
- Thirdborn Gloves
- Jewelry
- Thirdborn Tira Nui Badge
- +3 Might
- Ashfall’s Legacy
- +10% Attack Damage and +20% Critical Hit Damage with pistols and arquebuses
- +15% Critical Damage
- Thirdborn Tira Nui Badge
- Active God Totem
- Eyes of the Obscured
- Eyes of the Obscured
- Key Character Stats
- Base Critical Hit Chance: 51%
- Critical Hit Damage Bonus: 85%
- Abilities
- Fighter
- Armored Grace (1/3)
- Devastating Criticals (2/3)
- Retribution (3/3)
- Ranger
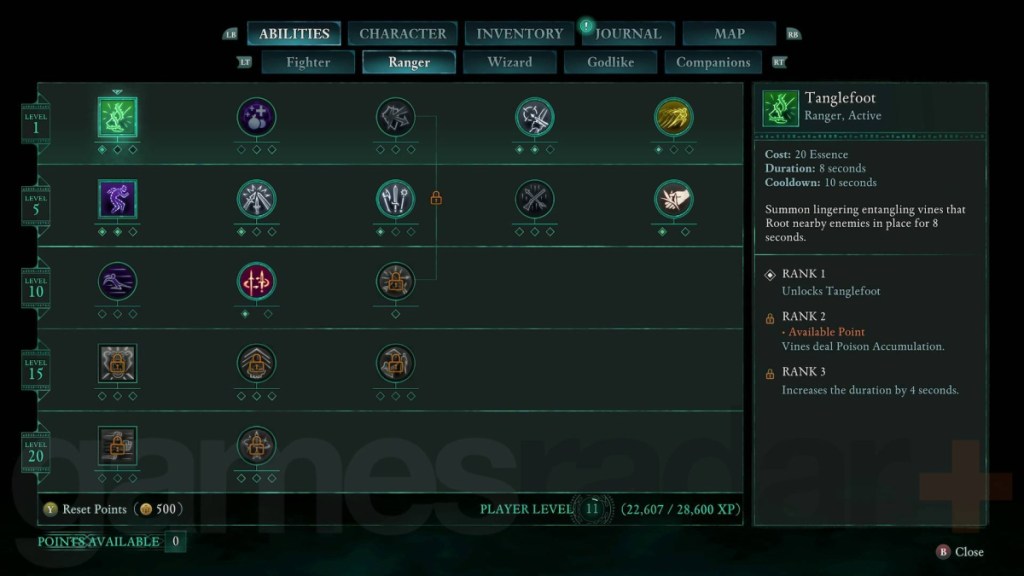
- Tanglefoot (3/3)
- Piercing Thrusts (2/3)
- Finesse (3/3)
- Marksmanship (3/3)
- Quick Switch (2/2)
- Critical Strike (3/3)
- Staggering Shot (1/3)
- Wizard
- Minor Missiles (2/3)
- Grimoire Mastery (1/4)
- Blizzard (2/3)
- Fireball (2/3)
- Crackling Bolt (2/3)
- Fighter

Leave a comment